Time-series data를 python을 이용해서 influxDB에 저장하고, Grafana로 그래프를 보여주는 예제
https://github.com/cychong47/influxdb_example.git
Install Grafana and influxDB
Install Grafana
직접 호스트에 설치할 수도 있지만, 세상 편하게 만들어준 docker를 이용해서 grafana, influxdb등을 설치하자.
mbpr15:~ cychong$ docker pull grafana/grafana
Using default tag: latest
latest: Pulling from grafana/grafana
f2aa67a397c4: Pull complete
89573effc7c8: Pull complete
b55c103da375: Pull complete
Digest: sha256:364bec4a39ecbec744ea4270aae35f6554eb6f2047b3ee08f7b5f1134857c32c
Status: Downloaded newer image for grafana/grafana:latest
Start grafana
mbpr15:~ cychong$ docker run -d -p 3000:3000 —name grafana grafana/grafana
148894d7009259b02b04e1a98467f549400be91f9b055f8686557d69b9339e4b
Install influxDB
influxdb도 docker 명령어 하나로 설치
influxdb | Docker Documentation
mbpr15:~ cychong$ docker pull influxdb
Using default tag: latest
latest: Pulling from library/influxdb
cc1a78bfd46b: Pull complete
6861473222a6: Pull complete
7e0b9c3b5ae0: Pull complete
ef1cd6af9147: Pull complete
07d71592a7b6: Pull complete
4df1ab172fbc: Pull complete
6f607c73c187: Pull complete
3fd297f39292: Pull complete
Digest: sha256:e3efb51395d630a912c3c24edb7567ec1ac01d3dfdc39f27f53ca0e15c3da797
Status: Downloaded newer image for influxdb:latest
Install influxdb module for python
python에서 직접 influxDB를 사용하려면 influxdb 모듈을 사용한다
mbpr15:~ cychong$ pip3 install influxdb
Collecting influxdb
  Downloading https://files.pythonhosted.org/packages/8d/79/7972c12e393080eda6920583c9c2ed2206771da7f6341c8971a2c02ff3d3/influxdb-5.0.0-py2.py3-none-any.whl (70kB)
    100% |████████████████████████████████| 71kB 709kB/s
Requirement already satisfied: requests>=2.17.0 in /usr/local/lib/python3.6/site-packages (from influxdb) (2.18.4)
Collecting python-dateutil>=2.6.0 (from influxdb)
  Downloading https://files.pythonhosted.org/packages/cf/f5/af2b09c957ace60dcfac112b669c45c8c97e32f94aa8b56da4c6d1682825/python_dateutil-2.7.3-py2.py3-none-any.whl (211kB)
    100% |████████████████████████████████| 215kB 2.9MB/s
Collecting pytz (from influxdb)
  Downloading https://files.pythonhosted.org/packages/dc/83/15f7833b70d3e067ca91467ca245bae0f6fe56ddc7451aa0dc5606b120f2/pytz-2018.4-py2.py3-none-any.whl (510kB)
    100% |████████████████████████████████| 512kB 5.0MB/s
Requirement already satisfied: six>=1.10.0 in /usr/local/lib/python3.6/site-packages (from influxdb) (1.11.0)
Requirement already satisfied: certifi>=2017.4.17 in /usr/local/lib/python3.6/site-packages (from requests>=2.17.0->influxdb) (2017.11.5)
Requirement already satisfied: idna<2.7,>=2.5 in /usr/local/lib/python3.6/site-packages (from requests>=2.17.0->influxdb) (2.6)
Requirement already satisfied: chardet<3.1.0,>=3.0.2 in /usr/local/lib/python3.6/site-packages (from requests>=2.17.0->influxdb) (3.0.4)
Requirement already satisfied: urllib3<1.23,>=1.21.1 in /usr/local/lib/python3.6/site-packages (from requests>=2.17.0->influxdb) (1.22)
hacking 1.0.0 has requirement flake8<2.6.0,>=2.5.4, but you’ll have flake8 3.5.0 which is incompatible.
hacking 1.0.0 has requirement mccabe==0.2.1, but you’ll have mccabe 0.6.1 which is incompatible.
hacking 1.0.0 has requirement pyflakes==0.8.1, but you’ll have pyflakes 1.6.0 which is incompatible.
docker-compose 1.17.1 has requirement requests!=2.11.0,<2.12,>=2.6.1, but you’ll have requests 2.18.4 which is incompatible.
Installing collected packages: python-dateutil, pytz, influxdb
Successfully installed influxdb-5.0.0 python-dateutil-2.7.3 pytz-2018.4
Start influxdb
Getting Started with Python and Influxdb | InfluxData
mbpr15:working cychong$ mkdir influxdb
mbpr15:working cychong$ cd influxdb/
mbpr15:influxdb cychong$ ls
mbpr15:influxdb cychong$ docker run -d -p 8086:8086 -v $PWD:/var/lib/influxdb influxdb
5088889ce21c9c9e2249db701694aa0bd39429371b5dababcf6ebb8c2e7598d3
To have customized config file for influxdb. First generate the default configuration file and update it. Then restart influxdb with that config file.
mbpr15:influxdb cychong$ docker run —rm influxdb influxd config > influxdb.conf
Merging with configuration at: /etc/influxdb/influxdb.conf

mbpr15:influxdb cychong$ docker run -d -p 8086:8086 -v $PWD:/var/lib/influxdb -v $PWD/influxdb.conf:/etc/influxdb/influxdb.conf influxdb -config /etc/influxdb/influxdb.conf
1d9ac4ffdca38b2c627da134273d7570c9c74182cb4bbedb8deebf09c3e5dc0a
Influx db write error
influxdb-python/tutorial.py at master · influxdata/influxdb-python · GitHub 샘플코드를 그대로 실행시키면 다음과 같은 에러를 만난다.
mbpr15:influxdb cychong$ python3 influxdb-ex.py
Create database: example
Create a retention policy
Switch user: smly
Write points: [{'measurement': 'cpu_load_short', 'tags': {'host': 'server01', 'region': 'us-west'}, 'time': '2009-11-10T23:00:00Z', 'fields': {'Float_value': 0.64, 'Int_value': 3, 'String_value': 'Text', 'Bool_value': True}}]
Traceback (most recent call last):
  File "influxdb-ex.py", line 73, in <module>
    main(host=args.host, port=args.port)
  File "influxdb-ex.py", line 45, in main
    client.write_points(json_body)
  File "/usr/local/lib/python3.6/site-packages/influxdb/client.py", line 468, in write_points
    tags=tags, protocol=protocol)
  File "/usr/local/lib/python3.6/site-packages/influxdb/client.py", line 532, in _write_points
    protocol=protocol
  File "/usr/local/lib/python3.6/site-packages/influxdb/client.py", line 312, in write
    headers=headers
  File "/usr/local/lib/python3.6/site-packages/influxdb/client.py", line 271, in request
    raise InfluxDBClientError(response.content, response.status_code)
influxdb.exceptions.InfluxDBClientError: 400: {"error":"partial write: points beyond retention policy dropped=1"}
무슨 말인가 찾아보니 retention policy라는 건 db에 저장하는 데이터가 특정 기준이상으로 오래된 것이면 저장을 불허하기 때문에 이 policy에 걸려 write 동작이 실패했다는 것이다.
points beyond retention policy !! what does this mean?? · Issue #9093 · influxdata/influxdb · GitHub
참고로 예제에서는 retention policy를 3일로 지정하고 있는데 샘플용 json 데이터에 지정된 시각이 2009-11-10T23:00:00Z라 에러가 발생한 것.
    print("Create a retention policy")

    client.create_retention_policy('awesome_policy', '3d', 3, default=True)
샘플에서 time 필드를 현재 시간으로 변경한다. 이때 influxdb가 원하는 시간 형태로 표시해야 한다. python - How to use time field in adding metrics data to the influx db? - Stack Overflow을 참고하여 수정.
from datetime import datetime
current_time = datetime.utcnow().strftime(‘%Y-%m-%dT%H:%M:%SZ’)
json_body[0]['time'] = datetime.utcnow().strftime('%Y-%m-%dT%H:%M:%SZ')
수정 후 정상적으로 동작
mbpr15:influxdb cychong$ python3 influxdb-ex.py
Create database: example
Create a retention policy
Switch user: smly
Write points: [{‘measurement’: ‘cpu_load_short’, ‘tags’: {‘host’: ‘server01’, ‘region’: ‘us-west’}, ‘time’: ‘2018-06-06T03:08:17Z’, ‘fields’: {‘Float_value’: 0.64, ‘Int_value’: 3, ‘String_value’: ‘Text’, ‘Bool_value’: True}}]
Querying data: select value from cpu_load_short;
Result: ResultSet({})
Switch user: root
Drop database: example
주기적으로 데이터를 influxdb에 저장
이제 주기적으로 데이터를 db에 저장해서 말그래도 time-series data가 되도록 한다.
import argparse
import time
import random

from datetime import datetime
from influxdb import InfluxDBClient

def setup_db(host, port):
    user = 'root'
    password = 'root'
    dbname = 'example'
    dbuser = 'smly'
    dbuser_password = 'my_secret_password'

    client = InfluxDBClient(host, port, user, password, dbname)

    print("Create database: " + dbname)
    client.create_database(dbname)

    print("Create a retention policy")
    client.create_retention_policy('awesome_policy', '3d', 3, default=True)

    print("Switch user: " + dbuser)
    client.switch_user(dbuser, dbuser_password)

    return client

def add_data(client, dl_tp, ul_tp):
    json_body = [
        {
            "measurement": "throughput",
            "tags": {
                "host": "server01",
                "region": "us-west"
            },
            "time": "2009-11-10T23:00:00Z",
            "fields": {
                "dl_tp" : 0,
                "ul_tp" : 0,
            }
        }
    ]

    json_body[0]['time'] = datetime.utcnow().strftime('%Y-%m-%dT%H:%M:%SZ')
    json_body[0]['fields']['dl_tp'] = int(dl_tp)
    json_body[0]['fields']['ul_tp'] = int(ul_tp)

    #print("Write points: {0}".format(json_body))

    client.write_points(json_body)

def main(host='localhost', port=8086):
    """Instantiate a connection to the InfluxDB."""

    client = setup_db(host, port)

    while True:
        dl_tp = random.uniform(150,200)
        ul_tp = random.uniform(50,70)
        add_data(client, dl_tp, ul_tp)
        time.sleep(1)

def parse_args():
    """Parse the args."""
    parser = argparse.ArgumentParser(
        description='example code to play with InfluxDB')
    parser.add_argument('--host', type=str, required=False,
                        default='localhost',
                        help='hostname of InfluxDB http API')
    parser.add_argument('--port', type=int, required=False, default=8086,
                        help='port of InfluxDB http API')
    return parser.parse_args()


if __name__ == '__main__':
    args = parse_args()
    main(host=args.host, port=args.port)
Influxdb에서 데이터 확인
influxdb container에 접속해서 cli 명령을 통해 db 내용을 확인해 본다.
mbpr15:influxdb cychong$ docker exec -it 1d9ac4ffdca3 influx
Connected to http://localhost:8086 version 1.5.3
InfluxDB shell version: 1.5.3
> use example
Using database example
> show field keys;
name: throughput
fieldKey fieldType
-------- ---------
dl_tp    integer
ul_tp    integer
> select * from throughput;
name: throughput
time                dl_tp host     region  ul_tp
----                ----- ----     ------  -----
1528255918000000000 0     server01 us-west 0
1528255919000000000 0     server01 us-west 0
1528255920000000000 0     server01 us-west 0
1528255921000000000 0     server01 us-west 0
1528255922000000000 0     server01 us-west 0
...
1528256939000000000 199   server01 us-west 50
1528256940000000000 189   server01 us-west 62
1528256941000000000 163   server01 us-west 50
1528256942000000000 152   server01 us-west 52
1528256943000000000 182   server01 us-west 69
1528256944000000000 191   server01 us-west 55
1528256945000000000 190   server01 us-west 61
1528256946000000000 178   server01 us-west 68
>
Grafana에서 influxdb에 저장된 정보 읽어오기
Grafana에서 data source로 influxdb 지정.(URL 필드에 http://localhost:8086 지정)
이상하게도 같은 머신에서 돌고 있는 influxdb의 주소를 localhost로 지정하면 연결이 안된다는 에러가 난다.
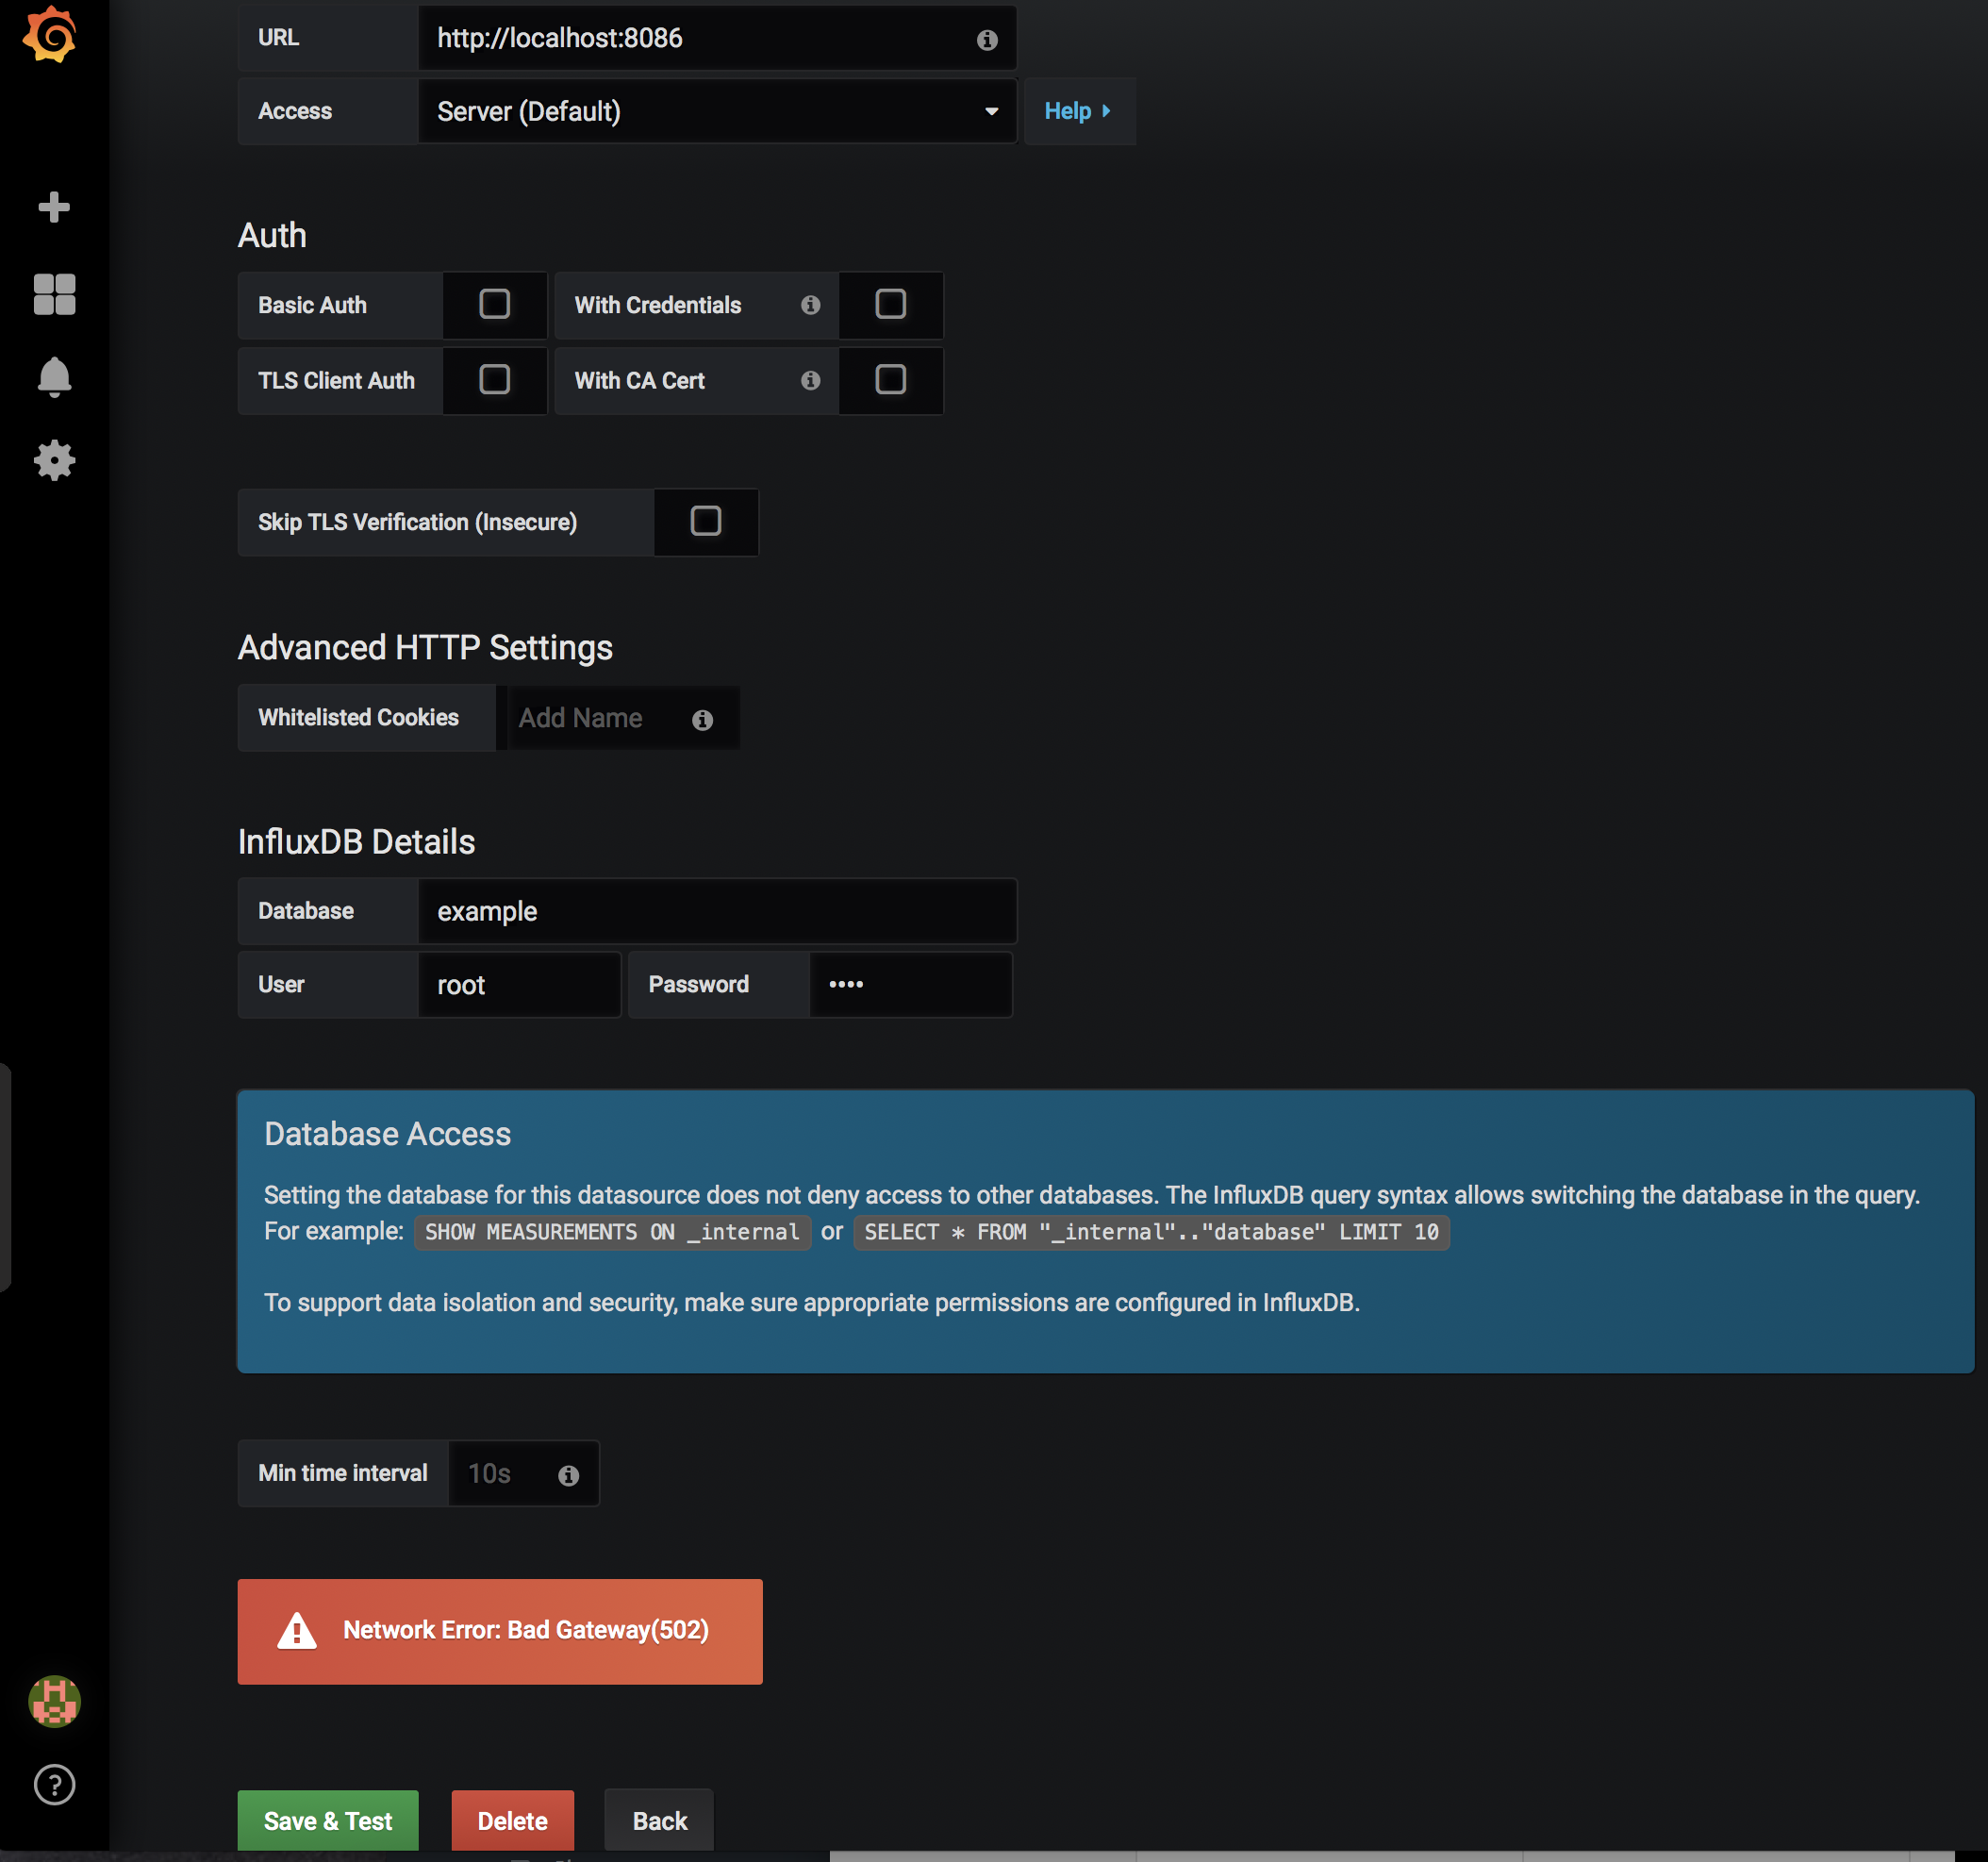
머신에 할당된 다른 IP를 지정하면 정상적으로 설정(이때는 스타벅스에서 실행했는데 이때 할당된 IP가 172.20.10.3 이었다)
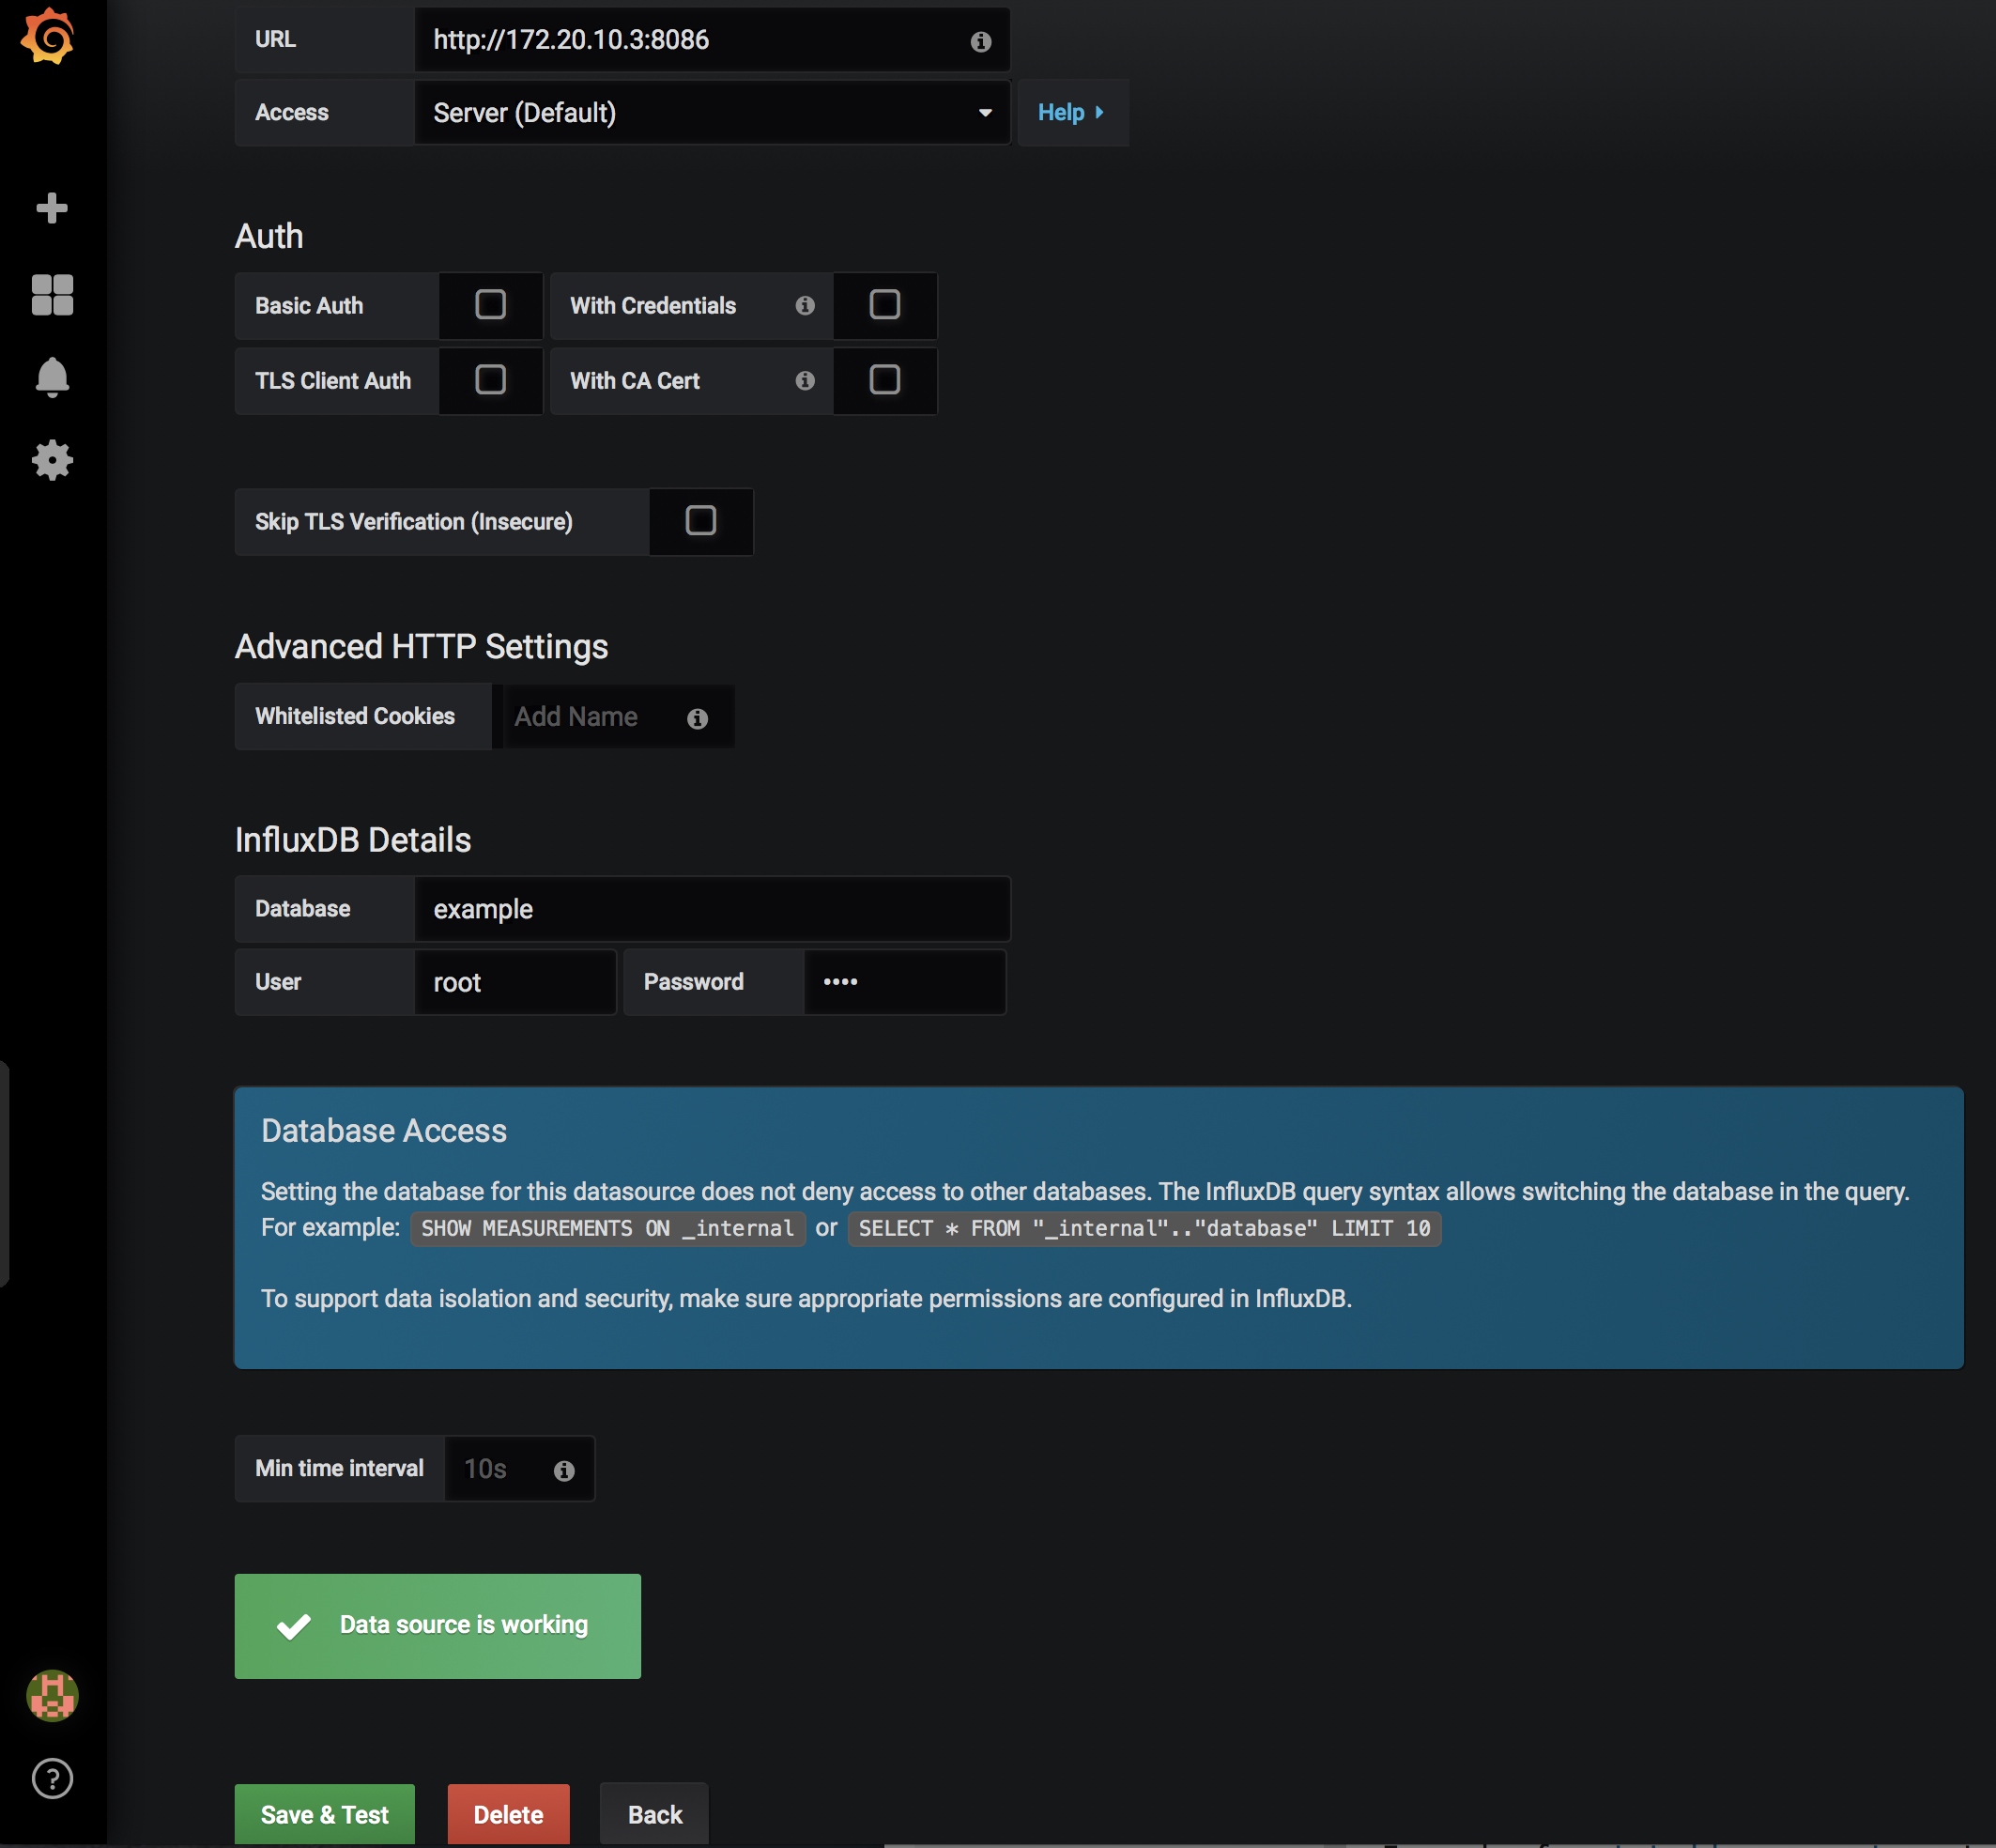
Everything is working finally
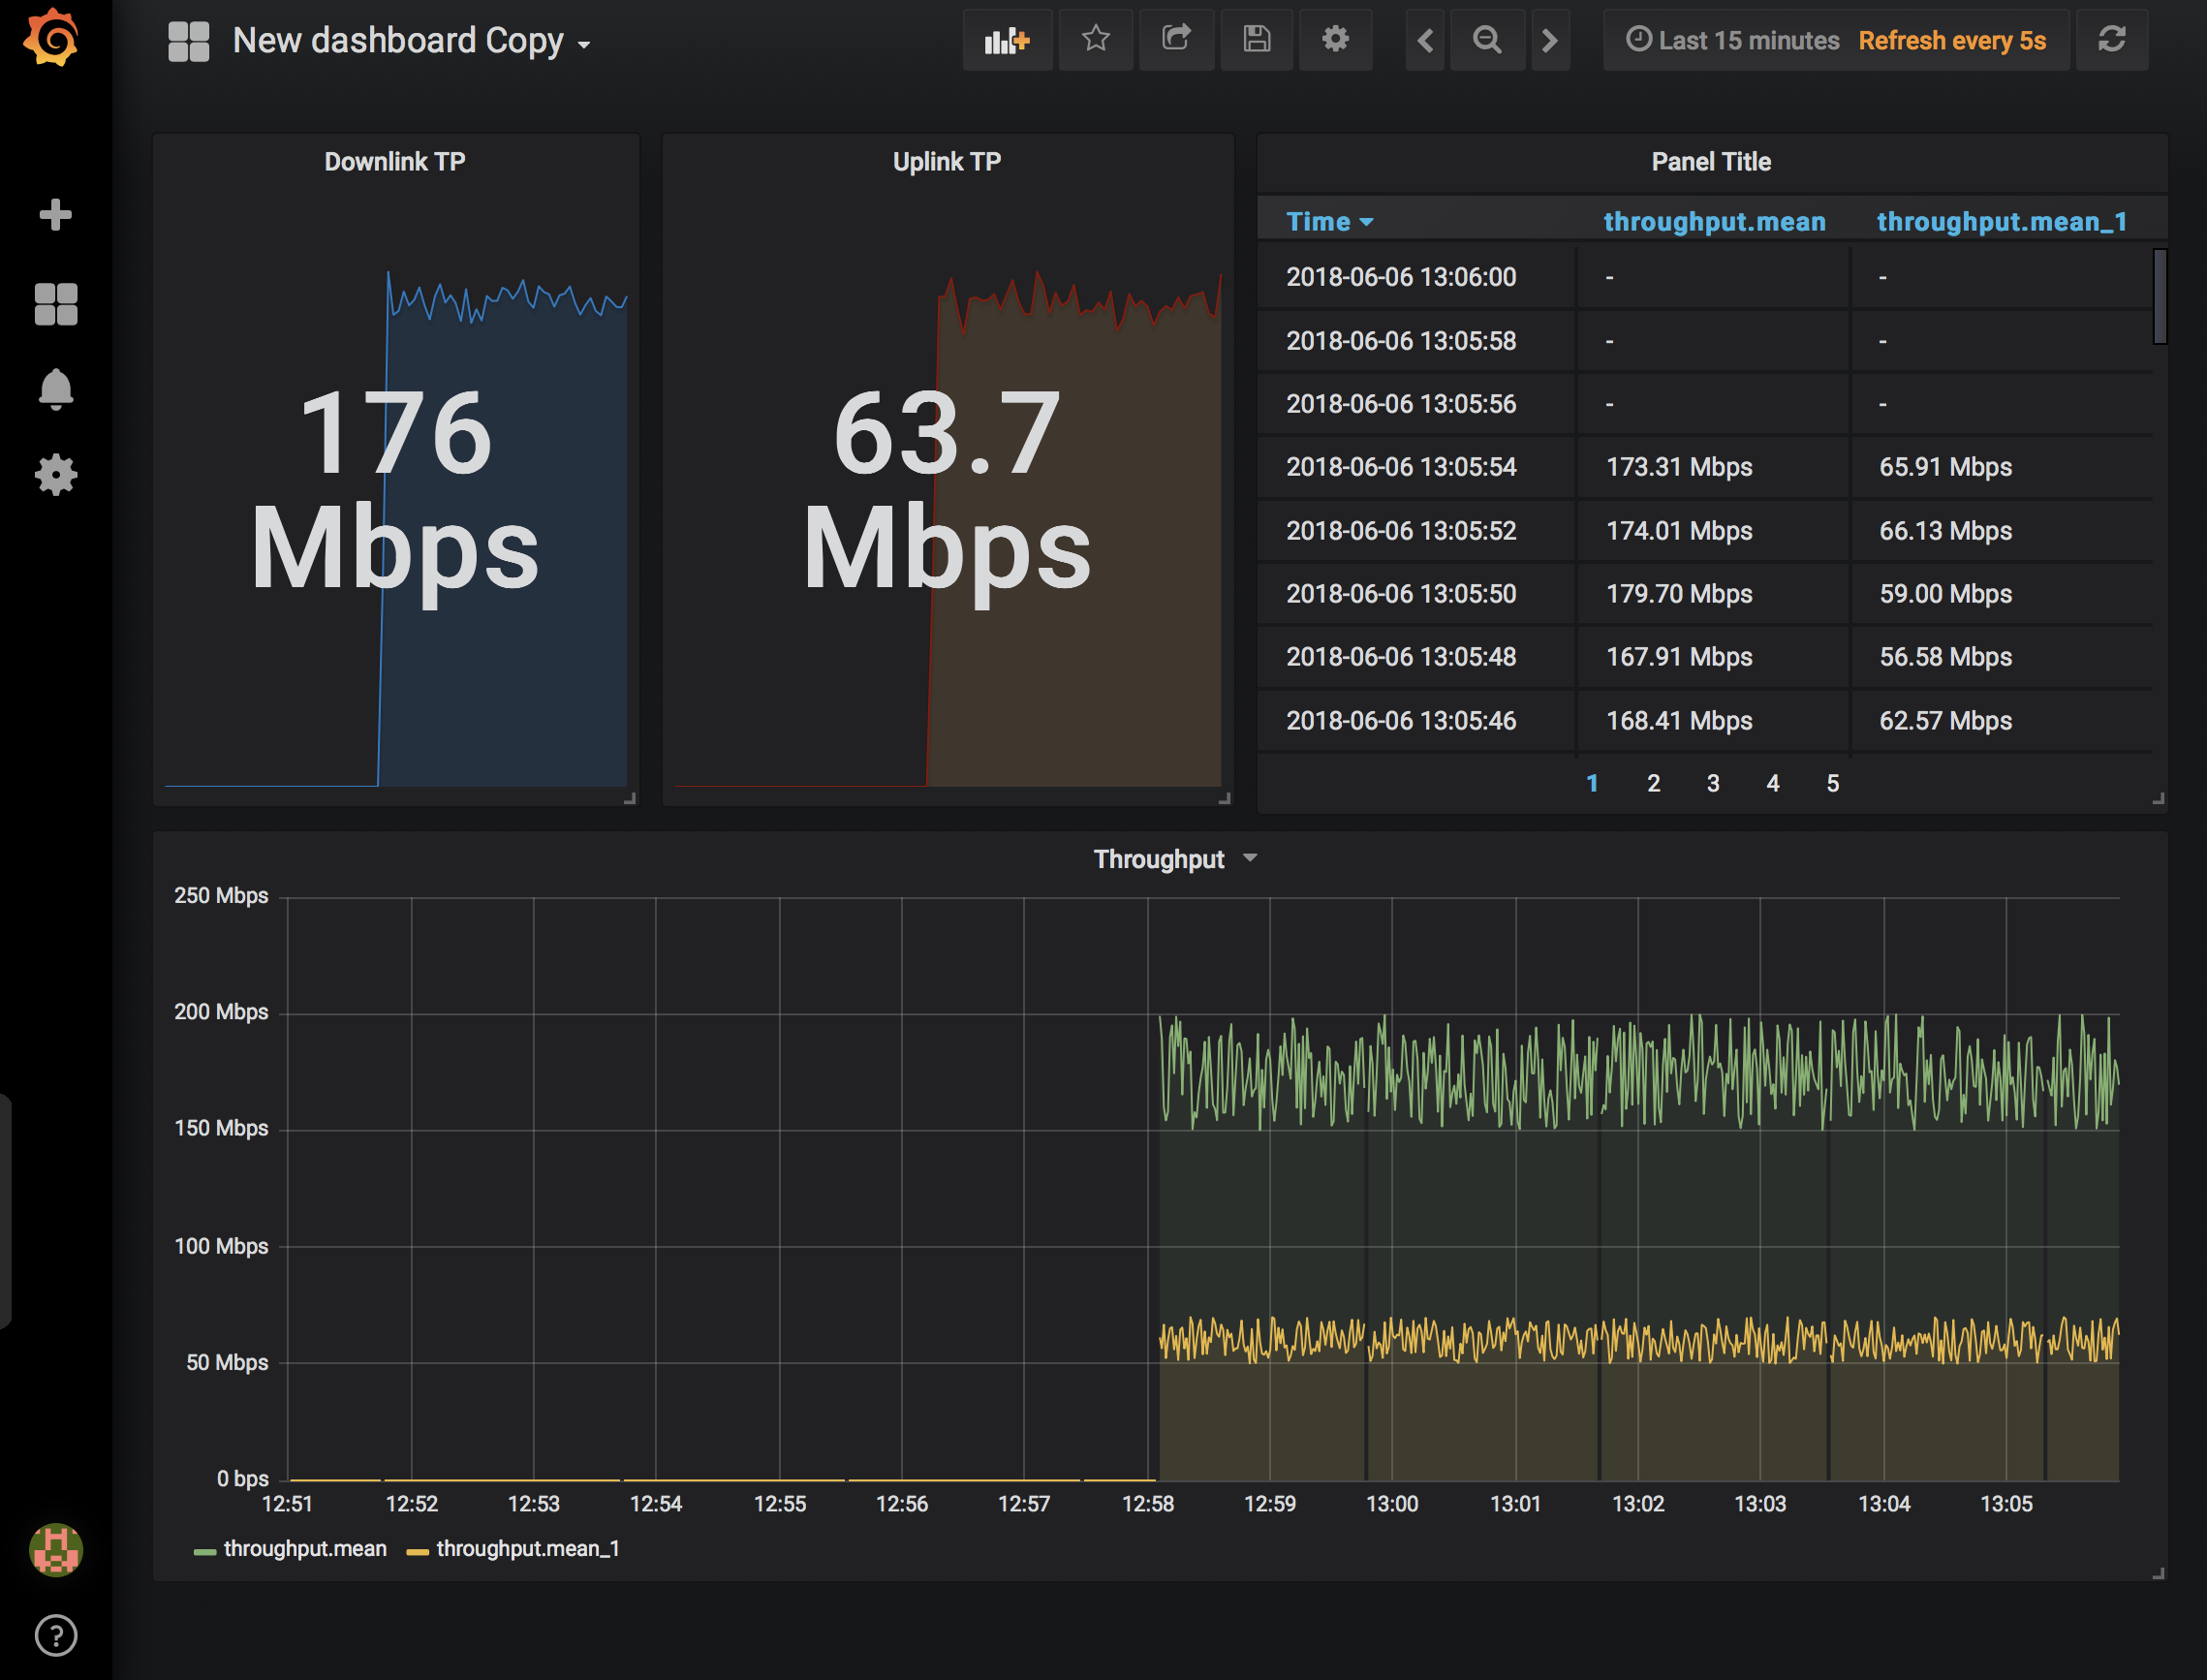
Tips for customizing grafana dashboard
Metric 설정할 때는 FROM에서 influxDB의 measurement를 선택하면 아래 SELECT의 필드에 자동으로 선택할 수 있는 fields가 제시된다.
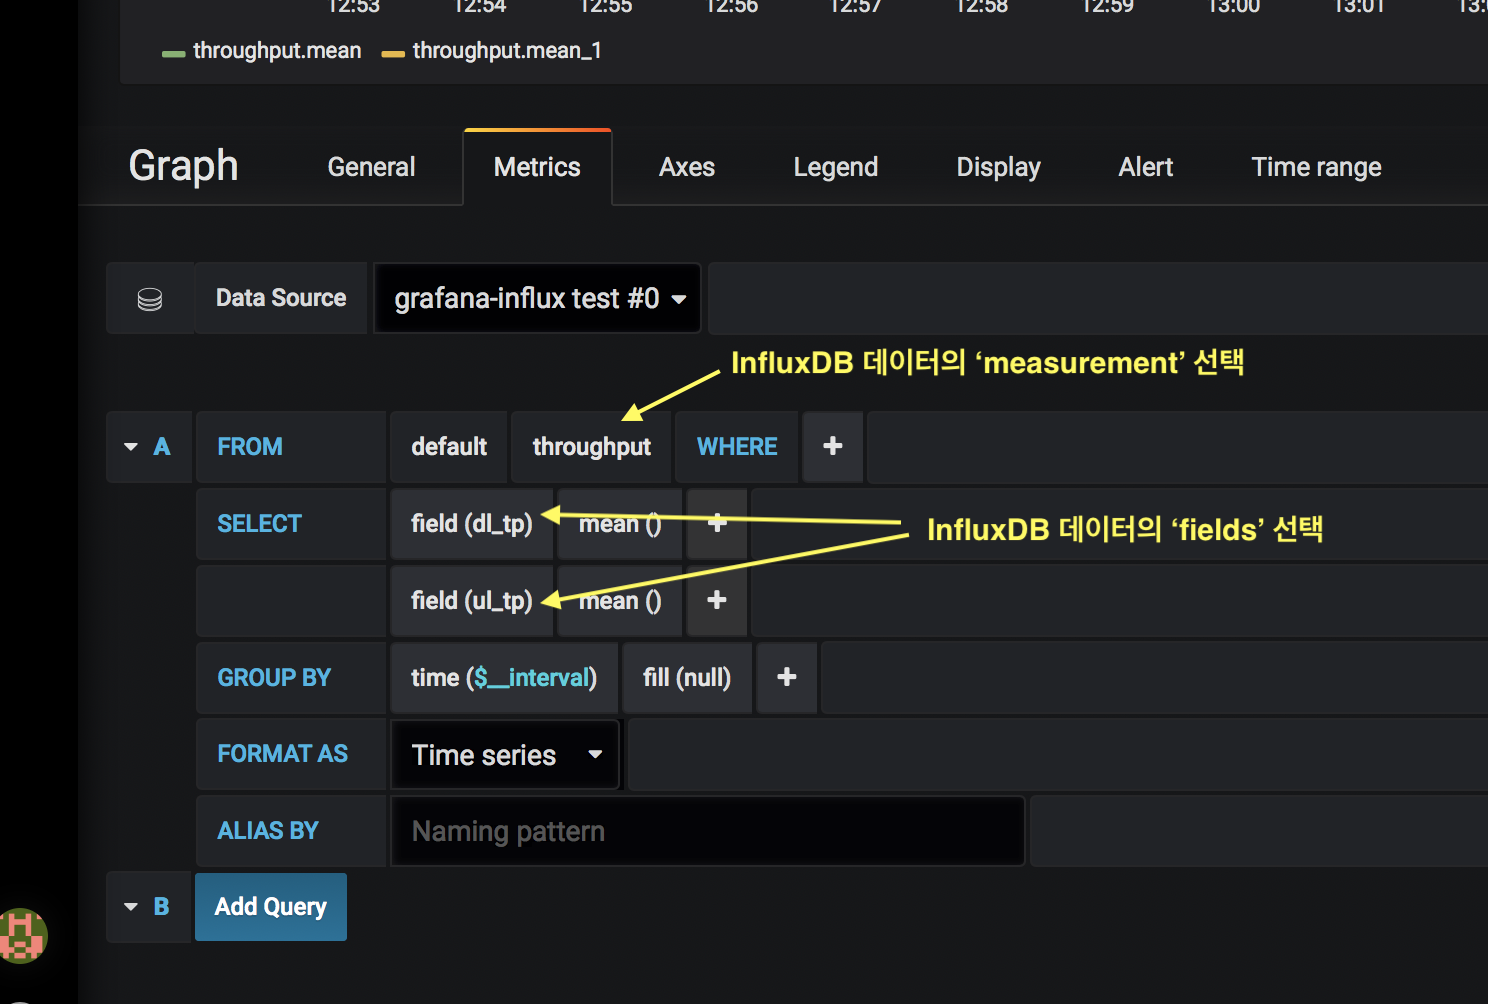
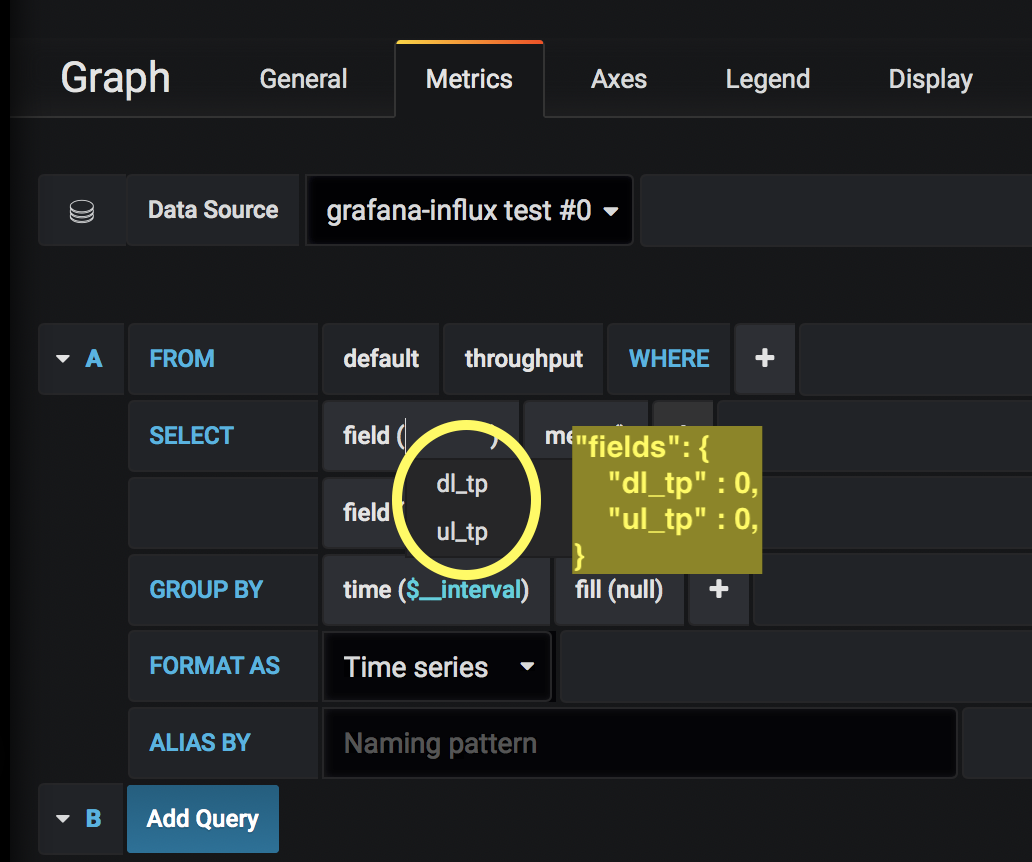
influxDB에 정보를 저장할 때 사용한 json과 비교해 보면 fields 에 정의했던 키들이 제시된다.
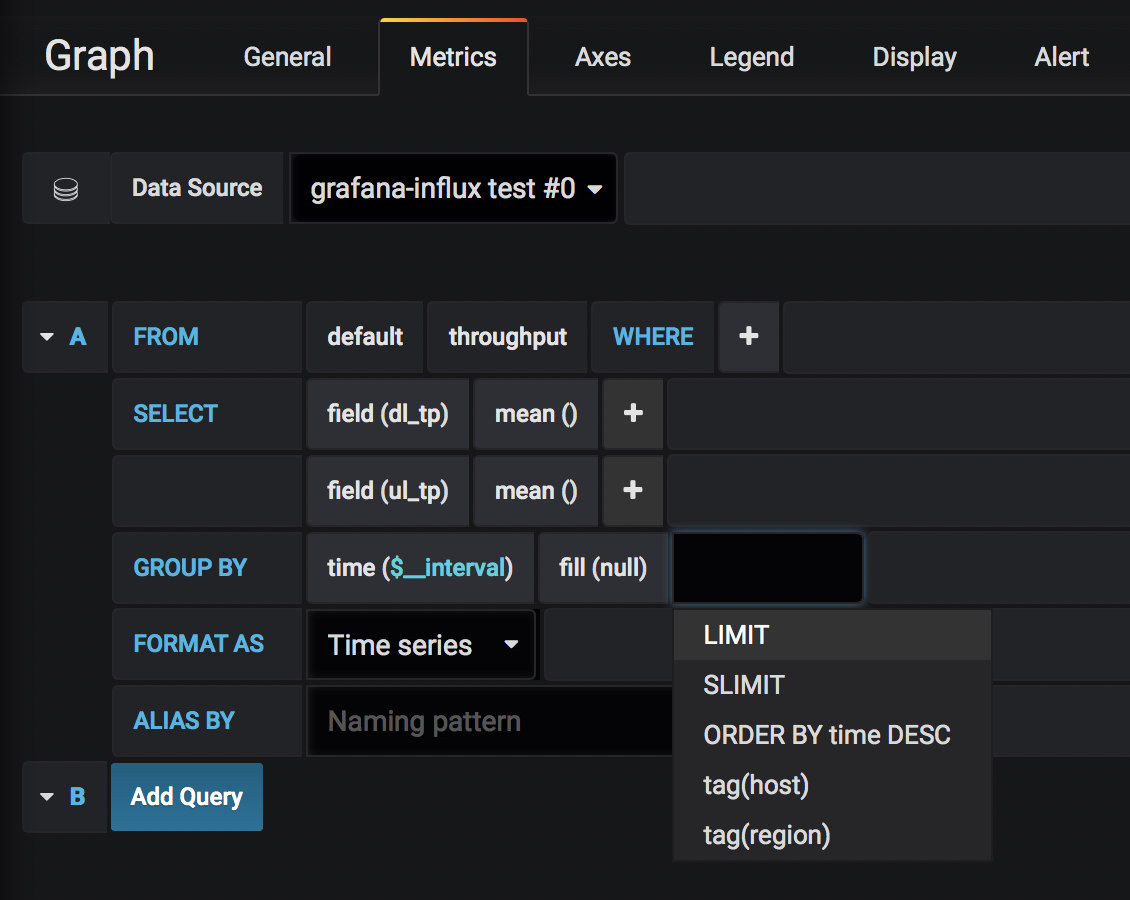
GROUP BY 는 데이터 중 특정 종류에 속하는 것만 보여주고 싶을 때 사용할 수 있다. 예를 들어 fields를 dl_tp와 ul_tp로 정의하지 않고, tags에 direction이라는 필드를 두고, fields는 그냥 tp로 정의할 수 있다. 즉 위 예제는 하나의 데이터 셋에 ul_tp와 dl_tp가 모두 있지만, UL tp만을 가진 데이터 셋과 DL tp만을 가진 데이터 셋으로 분리하여 influxdb에 저장할 수 있다. 이 경우 DL tp만을 가진 데이터 셋만으로 metric을 한정하려면 아래 있는 GROUP BY을 사용하여 tag(diretion)을 선택하면 되지 않을까?
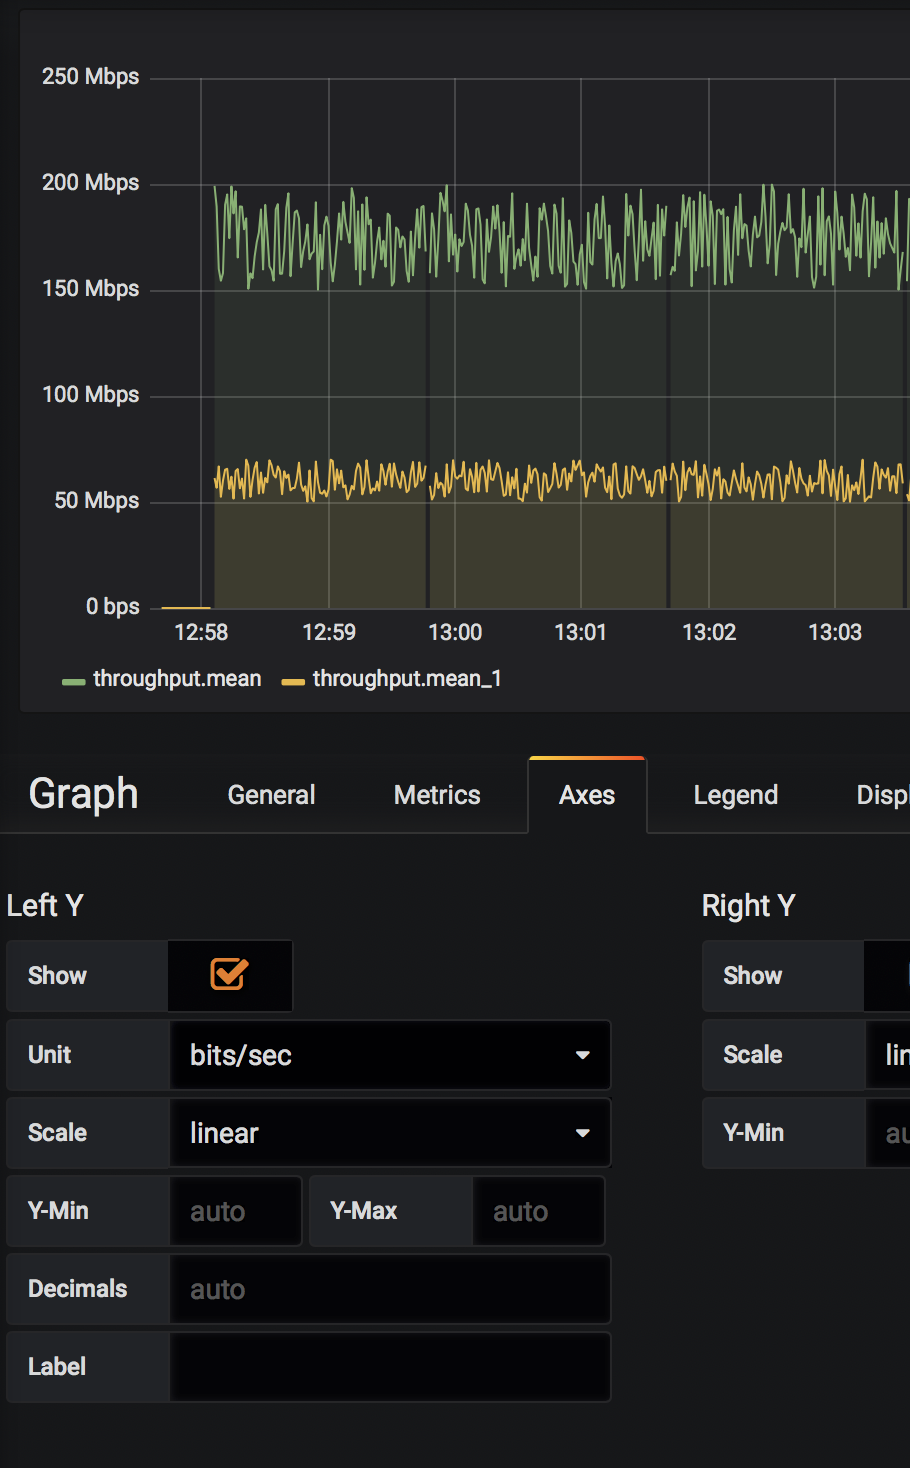
Axes 의 unit을 데이터에 맞는 적절한 것으로 선택하면 데이터의 특성을 강조할 수 있다. 아래는 data rate의 bits/sec를 선택한 경우이다.(데이터 값이 이미 Mbps로 전달된 경우에는 이를 고려하여 megabits/sec를 선택하면 된다)
